

how to change security preferences on mac
Guide to Mac Security Preferences
Macs are associated with security. The powerful built-in security system makes them more immune to threats than, let's say, PCs. That's why many users consider shifting from Windows to macOS.
However, buying a Mac and staying with the default security settings all the time is not enough. In this article, we'll cover the hottest Mac security questions.
First, let's figure out where to click to change security preferences on your Mac. All roads lead to System Preferences:
1. Click the Apple logo—choose System Preferences .
2. Go to the Security & Privacy tab—and click General .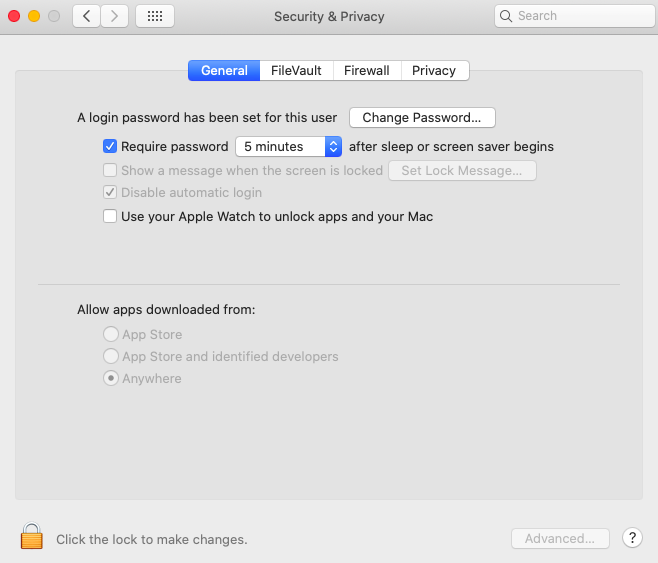 3. Take a look at the left bottom corner of the window.
4. Click the padlock—key in your admin password to make changes.
Read on, and we'll guide you through the necessary steps to enhance your Mac's security.
Turn on the Require password… feature when Mac is idle
It's easy to get distracted with remote work and go to some other room to do some stuff while leaving your Mac unattended. It's good that you're at home, and what if this happens when you've somewhere else? Some prying eyes might see some confidential information or even access files on your Mac.
Apple has a way to lock your Mac when idle:
-
- In the Security & Privacy tab, go to the General tab.
- Select Require password… after sleep or screen saver begins.
- Enter your admin password.
- Choose from Immediately to 8 hours. Usually, 15 minutes would do.
Disable automatic login
Mac can perform the automatic login for you without requesting a password if set up this way in the System Preferences. The advantage is the time when you need to look up something on your computer. However, the list of disadvantages outnumbers pluses.
In terms of security, this lets anyone nearby access your Mac. No password is not the best idea, so let's disable the automatic login option. It requires just one step:
- When on the same General tab, tick next to the Disable automatic login .
And that's all. Next time you restart your Mac, be ready to type in your password.
Allow apps downloaded from… option
It's hard to keep track of the apps we download and install from the App Store or the internet when looking for a free solution. When downloading the risk of malware infecting your Mac is high. Apple has taken care of that too and introduced a feature that can prevent malware from getting on your computer.
Let's enable the Allow apps downloaded from option on your Mac:
- System Preferences— Security & Privacy—General .
- Unlock the lock to make changes.
- Take a look at the options— App Store and App Store and identified developers.

Note: in macOS versions before macOS Catalina, you'll see another option named Anywhere. Check out the screenshot below for this.
- Tick the App Store option to allow apps downloaded from the App Store only
- Tick the App Store and identified developers option to download apps both from the App Store and developers, which are identified by Apple itself
- Tick Anywhere (in version prior to macOS Catalina) to download apps from anywhere on the internet
Unlock your Mac with Apple Watch
With modern requirements to have a strong password—typing it each time you log in is time-consuming, and frequently you can make mistakes. If you're an Apple Watch owner and wear it while working on your Mac—then consider enabling unlocking your Mac with it.
Put on your Apple Watch and do this:
- Open System Preferences— Security & Privacy tab—General .
- If the lock is locked—click it—type in your admin password.
- Tick next to Use your Apple Watch to unlock apps and your Mac.
- Enter your iCloud password if prompted.
Note: This iCloud feature can be turned on if your Mac supports the Auto Unlock function. Plus, it should be running watchOS 6 or later.
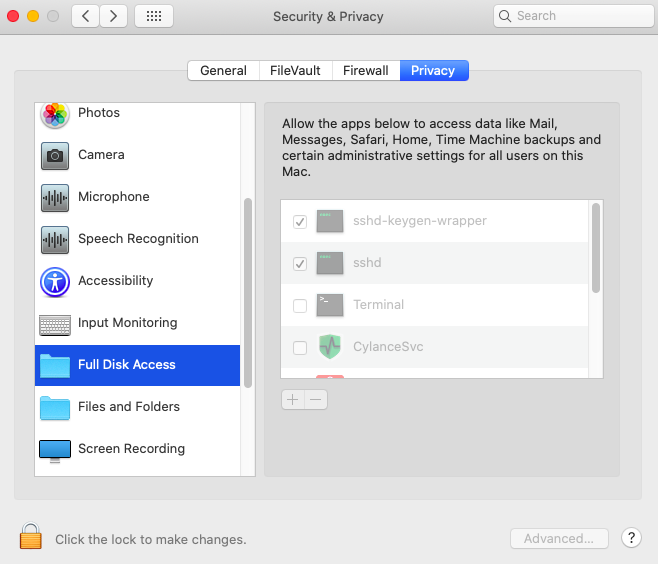
Allow apps to access your Camera or other Information
When you install apps for video conferencing, chatting, or any other purposes, do you click right away on the popup asking you to allow access? Often in a hurry, we overlook and give permissions. With the Privacy pane, you can control and manage the data your Mac makes visible to others on a network or the internet.
- Go to System Preferences— Security & Privacy —the Privacy tab.
- In the left-hand pane, scroll through the categories to see which apps gained access.
Note: To make some changes, you'll need to unlock the lock at the left bottom part of the Privacy window.
Let's take a look at a few of them:
- Full Disk Access: here, you can check what apps have access to all your Mac's files. This can include information on some other apps like Safari, Messages, or Mail). Untick the ones you don't want to give access to.
- Files and Folders: apps on this list access files and folders in various Mac's locations. Untick an app not to grant it any access.
-
- Camera: Many Mac users are reluctant to give access to their camera once requested by some apps. On this list, dissect the apps that have accessed your Mac's camera on your Mac.
- Microphone : Same as for the Camera access—deselect the apps you don't want to have access to your mike.
- Accessibility: apps on this list can run system commands and scripts to control your computer. Uncheck the boxes next to the apps to prevent them from controlling your system.
It's also a good idea to take care of the location services .
In addition, check a brief description of each category in the Privacy pane on Apple's official website .
Change security settings for Safari
Safari is claimed to be the fastest browser for macOS, and with the update to macOS Big Sur , it is one the safest too. If you still use some other browsers and not Safari—after reading this, you might reconsider.
Taking care of your Safari settings will prevent such common problems as Bing redirects or sites you visit tracking where you click. That's just a small part of how Safari browsing can be secured.
Get a warning when on a fraudulent website
- Open Safari Preferences—Security tab.
- Tick the Select the Warn when visiting a fraudulent website box.
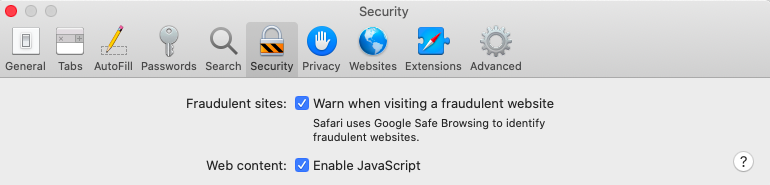
With this feature on, Safari will show you an on-screen warning before you open a fraudulent website.
Prevent cross-site tracking in Safari
This is helpful when you're browsing for an item, and then you see ads for this product everywhere you click. This is the algorithm of cross-site tracking. The good news you can turn it off in Safari:
- Go to the Privacy tab once again.
- Tick the Prevent cross-site tracking checkbox.

Note: Under the Prevent cross-site tracking checkbox, you can also tick Block all cookies . Why block cookies? Sometimes they save information that displays some preferences you might want to stay private.
Control the pop-ups and permissions in Safari
When opening a website, you often see a popup asking your permission to give this very website access to your location or something else. To deal with this:
- In Safari Preferences, go to the Websites tab.
- Click the Pop-up Windows option.
- On the right side, choose the website you want to manage. Select the preferred option from the drop-down menu.
Summing up
There are many tricks to macOS privacy and security enhancement. We hope this guide walked you through the basic steps you could follow right now to strengthen your Mac's security setting!
how to change security preferences on mac
Source: https://www.whatsontech.com/how-to-change-security-preferences-on-a-mac/
Posted by: starkbedeencion.blogspot.com
0 Response to "how to change security preferences on mac"
Post a Comment